

Introduction:
Welcome to the world of USB drives, where versatility meets functionality. In this concise guide, we’ll unravel the mysteries surrounding Convert Bootable USB to Normal. Ever wondered if a bootable USB can be transformed into a regular one? Or questioned the speed disparity between the two? We have the answers.
Explore efficient methods to Convert Bootable USB to Normal, whether you’re on Windows or Mac. Uncover tips on formatting, changing drive letters, and rescuing lost data from a pen drive. With straightforward steps and minimal risk, you can effortlessly transition your USB to meet your specific needs.
Curious? Dive into the articles below and take control of your USB experience. Discover the simplicity behind converting, formatting, and optimizing your USB drives. Let’s Convert Bootable USB to Normal journey a seamless and informed one.
1. Questions About Bootable and Normal USB:
What is a bootable USB, and how does it differ from a normal USB?
A Convert Bootable USB to Normal serves as a startup disk, capable of running an operating system or installer. Unlike a regular USB, it is designed to initiate the boot process of a computer. Understanding this distinction is crucial for users seeking specific functionalities from their USB drives.
Can a bootable USB be converted to a normal USB?
Yes, it is possible to Convert Bootable USB to Normal. The following sections will outline simple methods for achieving this transformation on both Windows and Mac platforms.
Are all USB drives capable of being bootable?
Not all USB drives are inherently bootable. The ability to boot depends on the drive’s format and the presence of essential boot files. Users can, however, format a Convert Bootable USB to Normal drive to make it bootable if needed.
Is a bootable USB slower than a normal USB?
The speed of a bootable USB depends on various factors, including the data transfer rate of the USB drive and the complexity of the operating system or tools installed. While it may appear slower during the boot process, general data transfer speeds are comparable to those of a regular USB.
Is a bootable USB formatted as FAT32 or NTFS?
The format of a bootable USB can vary, but commonly, it is formatted as FAT32. This format is widely supported and compatible with various systems. However, NTFS is also a valid format for bootable USBs, depending on the specific requirements or limitations of the operating system being used.
2. Methods to Convert Bootable USB to Normal:
Windows:
Format bootable USB in File Explorer:
Navigate to File Explorer, locate your USB drive, right-click, and choose the “Format” option. Follow the prompts to format the drive, Convert Bootable USB to Normal state.
Unboot bootable USB using Disk Management:
Access Disk Management, find your USB drive, right-click, and select “Delete Volume.” Afterward, format the unallocated space to transform the USB into a normal state.
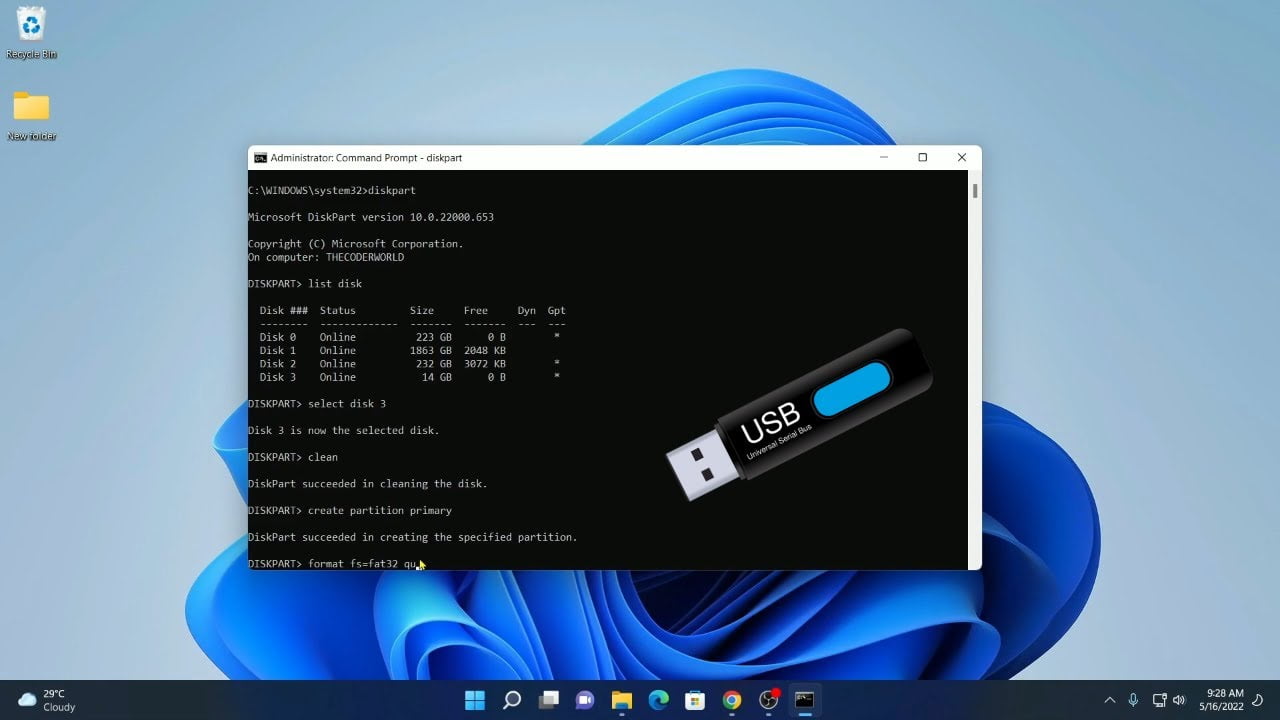
Convert bootable USB to normal via Diskpart CMD:
Open Command Prompt, type “diskapart,” select your USB drive, clean the drive, and then create a new primary partition. Finally, format the partition to complete the conversion.
Convert bootable USB to normal on Mac:
Utilize the Disk Utility application on Mac to erase and reformat the USB drive, effectively Convert Bootable USB to Normal regular state.
Additional Methods for Windows 11/10:
Convert bootable USB drive to normal via MiniTool Partition Wizard:
Download and install MiniTool Partition Wizard, select your USB drive, and use the “Delete All Partitions” option. Follow with the “Create Partition” and “Format Partition” steps.
Format bootable USB to normal using Disk Management:
Access Disk Management, locate your USB drive, right-click, and choose “Format.” Follow the wizard to complete the formatting process.
Format bootable USB to normal using DiskPart:
Open Command Prompt, type “diskapart,” select your USB drive, clean the drive, create a new primary partition, and format it to transform the USB into a regular state.
Format bootable USB to normal using File Explorer:
Simply right-click on your USB drive in File Explorer, choose “Format,” and follow the on-screen instructions to complete the process.
These step-by-step methods provide users with diverse options for converting a bootable USB to a normal one, catering to different preferences and technical skill levels.
3. Formatting Bootable USB Drive:
Format bootable USB drive to normal in File Explorer:
- Open File Explorer.
- Locate your USB drive.
- Right-click on the USB drive.
- Select the “Format” option.
- Follow the on-screen instructions to complete the formatting process.
Format bootable USB drive to normal via Disk Management:
- Access Disk Management (search for “Disk Management” in the Start menu).
- Find your USB drive in the lower section.
- Right-click on the drive and choose “Format.”
- Follow the formatting wizard to complete the process.
Format bootable USB drive to normal via Command Prompt:
- Open Command Prompt as an administrator.
- Type “diskapart” and press Enter.
- Type “list disk” to display available disks.
- Type “select disk X” (replace X with your Convert Bootable USB to Normal drive number).
- Type “clean” to remove all partitions.
- Type “create partition primary” to create a new partition.
- Type “format fs=ntfs quick” to format the partition quickly.
- Type “exit” to leave DiskPart.
Changing USB Drive Letter:
Change a drive letter in Disk Management:
- Open Disk Management.
- Right-click on your USB drive.
- Choose “Change Drive Letter and Paths.”
- Click “Change.”
- Select a new drive letter.
- Click “OK” to apply the changes.
Change a drive letter via Command Prompt:
- Open Command Prompt as an administrator.
- Type “diskapart” and press Enter.
- Type “list volume” to display volumes.
- Type “select volume X” (replace X with your USB drive volume number).
- Type “assign letter=Y” (replace Y with the desired drive letter).
These straightforward methods empower users to format their bootable USB drives to a normal state, providing flexibility and adaptability to suit individual preferences and system requirements.
4. Convert Bootable USB to Normal Ubuntu:
To convert a bootable USB to a normal state on Ubuntu, open the Disk Utility application. Locate your USB drive, select it, and click on “Format.” Choose the desired file system and click “Format” again. This process erases the bootable data, returning the USB to a regular storage state.
5. Convert Bootable USB to Normal Rufus:
Rufus primarily focuses on creating bootable USBs, but you can revert a bootable USB to a regular one using Rufus. Open Rufus, select your USB drive, and choose “Non-bootable” in the Boot selection section. Proceed to start the process, and Rufus will remove the bootable attributes, leaving you with a normal USB.
6. Convert Bootable USB to Normal Linux:
On Linux, the process involves using the ‘dd’ command. Open the terminal and enter the following command:
sudo dd if=/dev/zero of=/dev/sdX bs=512 count=1
Replace ‘/dev/sdX’ with your USB drive’s identifier. This command writes zeros to the USB’s master boot record, effectively Convert Bootable USB to Normal state.
7. Convert Bootable USB to Normal CMD:
For Windows users, the Command Prompt (CMD) offers a straightforward solution. Insert your bootable USB, open CMD as an administrator, and enter the following commands:
diskpart

list disk

select disk X

clean

create partition primary

format fs=ntfs quick
Replace ‘X’ with the appropriate disk number. These commands will clean the drive and format it, removing the bootable elements.
8. How to Convert Bootable USB Back to Normal with Full Capacity:
To reclaim the full capacity of your USB after converting it back to a normal state, use the following steps:
- Insert the Convert Bootable USB to Normal and open Disk Management.
- Locate the USB drive, right-click, and choose “Delete Volume.”
- Right-click on the unallocated space and select “New Simple Volume.”
- Follow the wizard to create a new partition with the full capacity.
- Format the new partition to complete the process.
Following these steps ensures that your Convert Bootable USB to Normal returns to its original, non-bootable state with the full available capacity.
9. How to Convert a Bootable CD to a Bootable USB:
Convert Bootable USB to Normal involves creating a replica of the CD’s bootable content on the USB drive. Follow these steps:
- Insert the bootable CD into your computer.
- Plug in the USB drive you want to make bootable.
- Download and install a reliable tool like Rufus or WinToUSB.
- Open the tool and select the bootable CD as the source.
- Choose the connected USB drive as the destination.
- Configure any additional settings if necessary, such as partition scheme and file system.
- Click “Start” to initiate the conversion process.
- Once complete, the USB drive will be a duplicate of the bootable CD.
This method ensures that the USB drive is now ready to boot just like the original CD.
10. How to Make a USB Unbootable using CMD:
If you want to Convert Bootable USB to Normal drive unbootable, you can use the Command Prompt (CMD) on Windows. Follow these steps:
- Insert the bootable USB drive into your computer.
- Press
Win + Xand select “Command Prompt (Admin)” to open CMD as an administrator. - Type
diskpartand press Enter to launch the DiskPart utility. - Type
list diskto display all connected disks and their numbers. - Type
select disk X(replace X with the number of your USB drive) and press Enter. - Type
cleanand press Enter to remove all partitions from the USB drive. - Type
create partition primaryand press Enter to create a new primary partition. - Type
format fs=ntfs quickand press Enter to quickly format the partition. - Type
exitto close DiskPart.
Following these steps erases the bootable content from the USB drive, making it unbootable.
11. Steps to Make USB Unbootable using CMD:
If you prefer a step-by-step breakdown, here are the steps summarized:
- Insert Convert Bootable USB to Normal drive.
- Open Command Prompt as an administrator.
- Type
diskpartand press Enter. - Type
list diskand press Enter to identify your USB drive. - Type
select disk X(replace X with your USB drive number) and press Enter. - Type
cleanand press Enter to delete all partitions. - Type
create partition primaryand press Enter. - Type
format fs=ntfs quickand press Enter to format the partition. - Type
exitand press Enter to close DiskPart.
These steps ensure that your USB drive is no longer bootable, providing a clean slate for regular storage use.
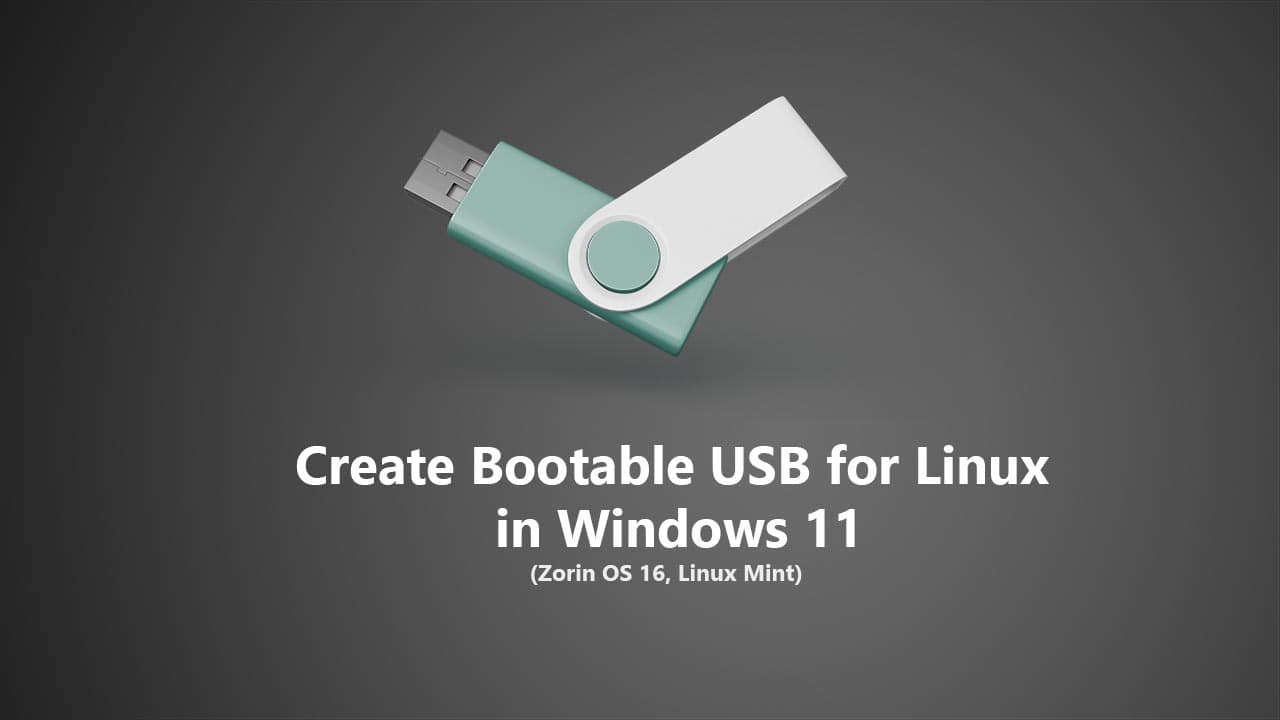
12. How to make a bootable USB flash drive of a Windows 11 installation ISO image from Linux Mint:
Convert Bootable USB to a Normal flash drive with a Windows installation ISO image from Linux Mint involves a few straightforward steps. Here’s a guide to help you through the process:
1. Download the Windows ISO:
- Obtain the Windows installation ISO image from the official Microsoft website. Choose the version and edition of Windows you want to install.
2. Install WoeUSB:
- Open the Terminal in Linux Mint.
- Install WoeUSB by running the following commands:
bash
sudo add-apt-repository ppa:tomtomtom/woeusb

sudo apt-get update

sudo apt-get install woeusb
3. Identify USB Drive:
- Insert your USB flash drive into a USB port.
- In the Terminal, run the command:
bash
lsblk
- Identify your USB drive from the list (e.g., /dev/sdX). Be cautious to select the correct drive to avoid data loss.
4. Format USB Drive:
- If your USB drive is not already formatted, format it to the NTFS file system. Replace ‘/dev/sdX’ with your USB drive identifier:
bash
sudo mkfs.ntfs /dev/sdX1
5. Use WoeUSB to Create Bootable USB:
- Execute the following command, replacing ‘/path/to/windows.iso’ with the actual path to your downloaded Windows ISO file and ‘/dev/sdX’ with your USB drive identifier:
bash
sudo woeusb --target-filesystem NTFS --device /path/to/windows.iso /dev/sdX
6. Wait for Completion:
- WoeUSB will now start the process of creating the bootable USB. Wait for it to complete.
7. Safely Eject USB Drive:
- Once the process finishes, safely eject the Convert Bootable USB to Normal drive from your Linux Mint system.
Your USB flash drive is now ready with a bootable Windows installation. You can use it to install Windows on a PC by booting from the USB drive. Remember to adjust the BIOS/UEFI settings on the target PC to prioritize booting from the USB drive.
How to Make a Live USB to Boot From a USB Drive:
Creating a Live USB to boot from a USB drive is a useful way to run an operating system without installing it on your computer. This is commonly used for trying out Linux distributions or troubleshooting a system. Here are the steps to make a Live USB:
1. Choose a Linux Distribution:
- Decide on the Linux distribution you want to use. Many distributions provide ISO images specifically designed for creating Live USBs.
2. Download the ISO:
- Obtain the ISO file of the Linux distribution from the official website. Ensure you download the version suitable for Convert Bootable USB to Normal.
3. Insert the USB Drive:
- Plug in the USB drive that you want to use for the Live USB. Be aware that all data on the USB drive will be erased during the process.
4. Check USB Drive Identifier:
- Open the Terminal and run the following command to list available drives:
bash
lsblk
- Identify your USB drive (e.g., /dev/sdX). Be cautious to choose the correct drive to avoid data loss.
5. Format the USB Drive:
- Format the USB drive to FAT32. Replace ‘/dev/sdX’ with your USB drive identifier:
bash
sudo mkfs.fat -F 32 /dev/sdX1
6. Use dd or a USB Writing Tool:
- You can use the ‘dd’ command to write the ISO to the USB drive. Replace ‘/path/to/linux.iso’ with the actual path to your downloaded ISO file and ‘/dev/sdX’ with Convert Bootable USB to Normal drive identifier:
bash
sudo dd bs=4M if=/path/to/linux.iso of=/dev/sdX status=progress && sync
- Alternatively, you can use graphical tools like BalenaEtcher or Rufus on Windows for this step.
7. Eject the USB Drive:
- Once the process is complete, safely eject the USB drive:
bash
sudo eject /dev/sdX
8. Boot from the Live USB:
- Insert the Live USB into the computer where you want to boot from it.
- Restart the computer and enter the BIOS/UEFI settings to set the USB drive as the primary boot device.
- Save the changes and exit, and your system should boot from the Live USB.
Now you have a Live USB that allows you to run the Linux distribution without making any changes to your computer’s hard drive. It’s a handy tool for testing, troubleshooting, or using a different operating system temporarily.
Conclusion:
In conclusion, transforming a bootable USB to a regular state is a simple yet powerful process that grants users greater control over their storage devices. The methods outlined in this guide, tailored for both Windows and Mac users, provide clear, concise steps to Convert Bootable USB to Normal, format, and optimize USB drives.
By addressing common questions and concerns in the FAQs, users can approach the conversion process with confidence, ensuring minimal risk and maximal efficiency. Whether your goal is repurposing, reformatting, or changing drive letters, this guide empowers you to navigate the intricacies of USB management. Seize the opportunity to tailor your USB drive to your specific needs and embark on a streamlined informed USB journey.
FAQs About Bootable USB and Normal USB:
Q1: What precautions should I take before Convert Bootable USB to Normal one?
Ensure you have backed up important data on the USB drive, as formatting or Convert Bootable USB to Normal may result in data loss. Double-check the content and make necessary backups before proceeding.
Q2: Can I Convert Bootable USB to Normal back to its original state if needed?
Yes, you can recreate a bootable USB by reinstalling the necessary boot files and the operating system. However, this process requires the original installation files.
Q3: Are there specific limitations to changing the drive letter of a USB?
Changing the drive letter typically doesn’t affect the functionality of the USB drive. However, be cautious when changing the letter of system or program drives, as it may cause errors.
Q4: Can I format a bootable USB on any computer?
Yes, you can format a bootable USB on any computer, regardless of the system it was initially created on. The formatting process is generally compatible across different operating systems.
Q5: What file system is recommended for formatting a bootable USB to a normal state?
FAT32 is commonly recommended for its compatibility with various systems. However, NTFS is also a viable option, depending on your specific needs and the requirements of the operating system you plan to use.
These frequently asked questions provide additional insights into the intricacies of dealing with bootable and normal USB drives, addressing common concerns and ensuring a smoother user experience.