Introduction
If you’ve ever wondered how to tie a flat bow on a dress so it looks clean, symmetrical, and refined, you’re certainly not alone. A well-shaped flat bow can instantly elevate your outfit. It adds charm, structure, and a thoughtful finishing touch.
Whether you’re dressing for a wedding, cocktail party, formal dinner, or even a casual daytime event, knowing how to tie a flat bow on a dress properly helps your outfit look intentional and polished.
Quick Answer: To tie a flat bow on a dress, start with even sash lengths, secure a flat base knot at the waist, form two balanced loops, and adjust gently so the bow lies smoothly against the fabric. The key is equal loop size and avoiding over-tightening.
In this complete dress sash bow tutorial, you’ll learn:
-
The correct way to tie a flat bow on a dress
-
How different fabrics affect the result
-
How to fix uneven or bulky loops
-
Practical ways to keep your bow secure all day
By the end, you’ll be able to create a professional-looking flat bow with confidence.
Table of Contents
ToggleWhy Learning How to Tie a Flat Bow on a Dress Matters
A flat bow is more than a decorative detail. When tied correctly, it:
-
Enhances the silhouette
-
Defines and supports the waistline
-
Creates visual balance
-
Elevates simple designs
-
Allows adjustable fit without bulk
Unlike oversized bows that stick outward, a flat bow lies smoothly against the body. The result is sleek, structured, and elegant. That’s why understanding how to tie a flat bow on a dress correctly makes a noticeable difference in your overall presentation.
There’s plenty more to explore check out our other posts!
What Is a Flat Bow?
Before learning how to tie a flat bow on a dress, it helps to understand what makes a bow “flat.”
A flat bow:
-
Lies close to the body
-
Has evenly proportioned loops
-
Does not puff outward
-
Holds structure without stiffness
You’ll commonly see flat bows on:
-
Wrap dresses
-
Bridesmaid gowns
-
Evening dresses
-
Party wear
-
Children’s formal outfits
Flat Bow vs Regular Bow: What’s the Difference?
| Feature | Flat Bow | Regular Bow |
| Shape | Lies close to the body | Sticks outward |
| Loop Size | Even and controlled | Often larger and puffier |
| Best For | Formal and structured dresses | Decorative or dramatic styles |
| Visual Effect | Sleek and refined | Bold and eye-catching |
Now let’s go step by step and learn how to tie a bow on a dress sash so it stays flat and neat.
Step-by-Step Guide: How to Tie a Flat Bow on a Dress Perfectly
Follow these detailed instructions for a clean, symmetrical finish.
Step 1: Start with Even Straps or Sashes
The foundation of a balanced bow begins here.
-
Pull both ends straight.
-
Align them so they are equal in length.
-
Smooth out wrinkles or twists.
If one side is longer than the other, the final bow will look uneven. Taking a few extra seconds here prevents retying later.
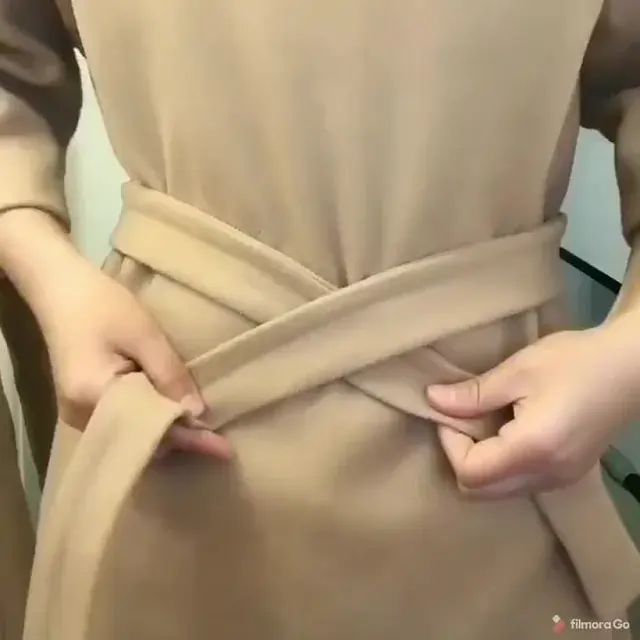
Step 2: Cross One End Over the Other
-
Cross the right strap over the left.
-
Pull it underneath.
-
Gently tighten at the waist.
The base knot should sit flat against the dress. This anchors everything in place and helps your waist bow look neat from the start.
Step 3: Form the First Loop
Create a loop with one side (similar to forming a “bunny ear”).
Keep in mind:
-
The loop should lie flat.
-
Avoid twisting the fabric.
-
Hold it firmly in place.
The size of this first loop determines the overall scale of your bow.
Step 4: Wrap the Other End Around the Loop
Take the remaining strap and wrap it around the center of the loop.
This forms the middle “knot” section.
Important:
-
Keep it snug.
-
Avoid over-tightening.
-
Maintain flatness in the fabric.
Too much tension can cause bunching, which makes the bow look bulky instead of smooth.
Step 5: Pull Through to Create the Second Loop
Push part of the strap through the opening behind the first loop.
Gently pull until a second loop forms.
You now have the basic shape of a flat bow.
Step 6: Adjust for Symmetry
This step determines whether your bow looks polished or messy.
-
Gently pull the loops (not the tails).
-
Make sure both loops are equal in size.
-
Flatten with your fingers.
-
Spread the fabric evenly.
The bow should rest smoothly against the dress rather than sticking outward. If you’re wondering how to make a bow lie flat, careful adjustment at this stage makes the biggest difference.
Expert Tip: If you’re preparing for photography such as weddings, graduations, or formal dinners take a quick photo of the bow from behind. Sometimes a bow looks balanced in the mirror but slightly uneven in pictures. A small adjustment can improve symmetry on camera.
How Fabric Type Affects Your Flat Bow
The material of your dress significantly impacts how the bow behaves. Different fabrics require slightly different handling.
Satin or Silk
These materials are smooth and can be slippery.
Best practices:
-
Tie slightly tighter than usual.
-
Consider a light double knot before shaping.
-
Smooth loops carefully to prevent sliding.
For example, satin bridesmaid dresses often need extra tension to maintain structure throughout a long ceremony and reception.
Cotton or Linen
These fabrics hold their shape well.
Tips:
-
Avoid pulling too tightly.
-
Focus on balanced loops.
-
Press gently with fingers to flatten.
These materials are forgiving and ideal when learning how to tie a flat bow on a dress for the first time.
Chiffon or Lightweight Fabrics
Light fabrics can appear airy and delicate.
Tips:
-
Make loops slightly larger.
-
Adjust gently.
-
Avoid excessive handling.
Overworking lightweight fabric can create wrinkles or distortion.
Fabric Thickness & Bow Structure
-
Thicker fabrics create stronger shape retention.
-
Thin fabrics require more careful tension control.
-
Stretch materials may loosen slightly throughout the day.
Understanding how fabric behaves helps you tie a waist bow neatly without constant adjustments.
How to Tie a Flat Bow at the Back of a Dress
Back bows can be challenging because you can’t see them.
Try this method:
-
Tie the bow loosely at the front.
-
Carefully rotate it to the back.
-
Use a mirror to check symmetry.
-
Reach behind and smooth the loops.
If precision matters such as at a wedding or engagement event asking someone to assist ensures alignment.
You may also want to read our guide on how to tie a wrap dress properly for additional styling tips and better waist definition.
Common Mistakes to Avoid
Even small errors can affect the final appearance.
1. Uneven Strap Length
Always align both sides before starting.
2. Twisted Fabric
Flatten the sash completely before forming loops.
3. Over-Tightening
Too much tension causes bulk and prevents the bow from lying flat.
4. Unequal Loops
Adjust loops not tails for balance.
5. Skipping the Final Flattening
Press the bow gently against the dress for a sleek finish.
How to Keep Your Flat Bow Secure All Day
If you’re attending a long event, stability matters.
Practical solutions include:
-
Using discreet fashion tape beneath the knot
-
Lightly steaming the sash before tying
-
Creating a subtle double knot under the bow
-
Avoiding frequent touching or adjusting
For events lasting several hours, check occasionally in a mirror to maintain symmetry and ensure the bow still lies flat.
Styling Ideas After Mastering the Flat Bow
Once you’re comfortable with how to tie a flat bow on a dress, you can adjust the look to suit different aesthetics.
Elegant
-
Centered bow at the back
-
Medium symmetrical loops
Modern
-
Slightly off-center placement
Romantic
-
Softer, slightly larger loops
Minimalist
-
Small, sleek loops
-
Tight center knot
A simple adjustment in size or placement can change the entire feel of your outfit while keeping the finish refined.
How to Fix a Bulky Flat Bow
If your bow looks too puffy:
-
Loosen the center knot slightly.
-
Pull loops outward instead of upward.
-
Press down gently.
-
Retie if needed.
In many cases, starting over produces a cleaner result than trying to correct a poorly tied bow.
Practice Makes Perfect
Like any skill, learning how to tie a flat bow on a dress becomes easier with repetition.
Practice using:
-
A robe sash
-
A ribbon
-
A belt
-
Scrap fabric
The more you practice, the faster and more consistent your bows will become.
When to Choose a Flat Bow Over Other Styles
A flat bow works best when:
-
You want elegance rather than drama
-
The fabric is delicate
-
The event is formal
-
You prefer subtle detailing
They are especially appropriate for:
-
Weddings
-
Engagement celebrations
-
Graduation ceremonies
-
Formal dinners
Flat bows provide refinement without overwhelming the outfit.
How to Tie a Flat Bow for Special Occasions
For important events:
-
Ensure loops are identical in size.
-
Steam the sash beforehand.
-
Take a quick photo to check balance.
-
Secure discreetly with fashion tape if needed.
Small details often make a visible difference in photographs and overall presentation.
Quick Checklist for a Perfect Flat Bow
Before leaving the house, check:
-
Are both loops equal in size?
-
Is the center knot flat?
-
Is the fabric smooth without twisting?
-
Does the bow lie close to the dress?
-
Does it look balanced in photos?
This simple review ensures your bow stays polished and neat.
Want to learn more? Our full collection of posts is ready for you!
Final Thoughts: Mastering the Flat Bow Technique
Learning how to tie a flat bow on a dress may seem like a small detail, but it has a significant impact on your overall look. A well-tied flat bow adds structure, polish, and understated elegance.
By:
-
Starting with even straps
-
Creating balanced loops
-
Adjusting carefully
-
Considering fabric behavior
You can achieve a clean, professional result every time.
Whether you’re styling a bridesmaid gown, preparing for a formal event, or refining a wrap dress, mastering how to tie a flat bow on a dress ensures your outfit looks intentional and complete. With practice, tying a neat, flat waist bow becomes second nature and your dresses will always look beautifully finished.
FAQs About Tying a Flat Bow on a Dress
Below are common questions people ask about tying a flat bow on a dress.
1. How do I keep my flat bow from coming undone?
Lightly double-knot before shaping the bow or use fashion tape beneath the knot for added security.
2. Why does my flat bow look uneven?
Unequal strap lengths or pulling one loop more than the other usually causes imbalance. Start with equal lengths and adjust loops carefully.
3. Can I tie a flat bow on slippery fabric like satin?
Yes. Tie slightly tighter than usual and smooth the loops gently. You can also secure it discreetly if needed.
4. How big should the loops be?
Loop size depends on the dress style. For formal wear, medium symmetrical loops work well. For minimalist styles, keep them smaller.
5. Is it better to tie the bow at the front or back?
For better control, tie it at the front first and rotate it to the back. This makes achieving symmetry easier.